How To Teach Interpretation & Expression
Principles of Melodic Interpretation: Finding Opportunities for Musical Expression
By Les Hicken
While listening to my trumpet students perform an orchestral excerpt by Stravinsky for their ensemble audition this past year, it was apparent to me that they demonstrated a wide range of musical expressions. This was particularly interesting because there were minimal expressive markings written by the composer for this passage. How do you explain the fact that one rendition is performed in a sensitive manner, while another is uninspired? Can musicianship be taught or is it a gift?
Melody is one of the primary elements found in music from all historical periods. How a musician interprets melody is one of the fundamental skills that separates the skilled amateur from the seasoned professional or transcendent virtuoso. As we listen to these great artists on recordings or live in concert, we marvel at their sensitive and intuitive approach to turning a musical phrase. We ascribe their musicianship to latent talent that is beyond the comprehension of mere mortals. However, is there a way to systematically break down the concept of “artistry” into rules and guidelines that can be formulated into component parts, which can then be subsequently sequenced and taught?
When students learn to play an instrument, interpreting a musical phrase is one of the preliminary steps in cultivating individual artistic expression.
However, many fundamentals of melodic interpretation are addressed using a less than systematic approach. Often, our students will not interpret melody unless prompted by specific instructions from the composer in the form of expressive markings on the page. Others will depend solely upon their ensemble conductor for melodic inspiration. If we can teach our students to interpret melody beyond the symbols that are indicated on the page, true artistry and creativity can be fostered. This approach takes principles learned from the private studio experience and applies them to the large ensemble environment.
As I study scores, the musical interpretation principles that I learned as a young clarinetist quickly fall into place. It is as if I am hearing the music through the point of view of my clarinet teacher. Stanley Hasty, professor emeritus of clarinet at the Eastman School of Music, taught us to interpret the music beyond what was notated through various principles that can be applied to any melodic passage. I have attempted to share the principles with my students in my role as a large ensemble director. If we can train our students to interpret the music the same way we do as conductors, we can create a synergistic musical environment in which everyone is contributing to the music-making process.
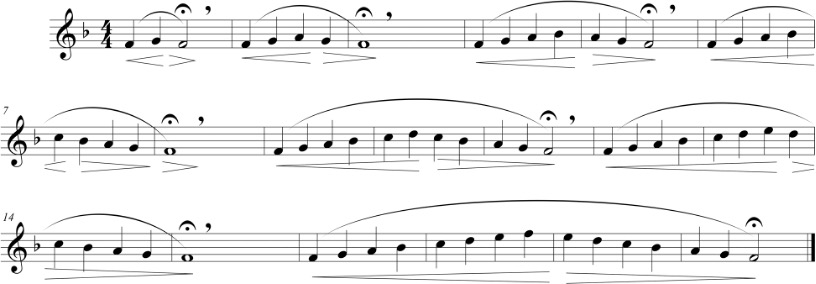
The first principle is very straightforward and an excellent starting point in learning how to interpret melody. Within a melodic passage, you follow the shape of the musical line. You crescendo when the notes go up in the melody and decrescendo when the pitches go down. We call this shaping the phrase. Many times composers expect this to happen naturally even though they do not specifically notate this in the score. Great musicians do this intuitively. We use the following exercise, called returning scales(Beck, 2002), to address shaping the musical phrase. While the performers ascend the scale, instruct them to crescendo and then to decrescendo as they descend the scale.
If you train your students to perform this exercise using scale degrees, you can easily transpose this to any key center.
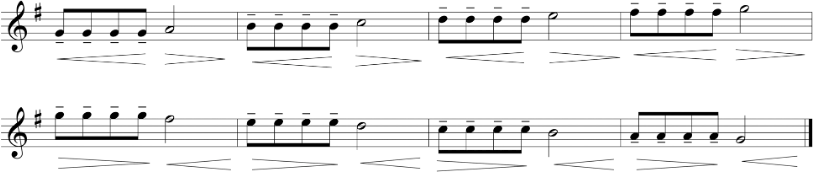
The second principle is that melodic sustained tones or repeated notes must not remain static; they either crescendo or decrescendo. The decision as to which choice will be made would be realized within the context of the musical phrase. Using scale work again during your warm- up, have your ensemble alternate repeated eighth notes and half notes on various scale degrees. With each repetition, apply either a crescendo or decrescendo to the sustained or repeated note in this manner.
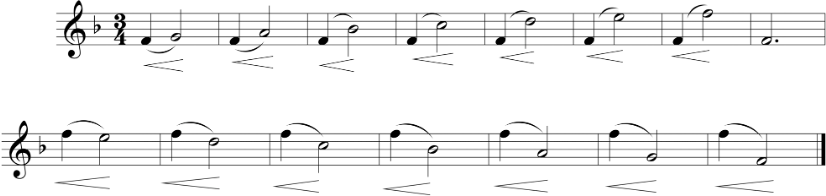
The third principle deals with expressive melodic intervals. It is helpful to imagine a great violinist making a melodic leap in either direction of an octave in an expressive passage. The technique that they use to connect the notes of the interval is called “portamento”. However, as wind players, we cannot slide into these upward pitches (glissando is not the desired effect here). We can connect these notes by increasing the air pressure on the first note and allowing the subsequent note to appear as a result of the airflow. A good way to teach this principle is to play diatonic intervals up and down from tonic. What you are listening for is a strong first note that leads to the second pitch of the interval achieved with no break in the sound. Additionally, you do not allow the upper note to crescendo out of context relative to timbre or dynamic. This is a powerful principle to enhance expressive melodic interpretation.
The fourth principle addresses the concept of ebb and flow in the music, which we will call tension and release. It can first be demonstrated through the natural progression of a major scale. The half steps that occur between the third and fourth and the seventh and eighth scale degrees are excellent examples of the relationship between dissonance and consonance. While performing unison scales, you can point out how the seventh scale degree resolves to the eighth degree, which adds a sense of tension to the musical line. The same phenomenon can be felt when the fourth scale degree resolves down to the third. Practice this exercise slowly so that you can feel the gravitational pull of the half step into the more consonant scale degree.

The next step in showing the relationship between tension and release is to use a highly dissonantchord that resolves to a tonic triad. To illustrate this point, assign your students to a Bb concert chord(Paynter, 1984) using the chart below. After the students successfully balance this chord, ask them to choosea note that is as far away from that pitch as they can possibly imagine and hold that note. This willachieve a highly dissonant collection of intervals that we will call a “crash” chord. Have the studentsperform the “crash” chord and then resolve to the Bb concert triad. The progression from dissonance toconsonance will be very obvious, especially if you have your students crescendo through the “crash” chord tothe resolution of Bb major.
| Group 1 | Group II | Group III | Group IV |
| Violin I | Violin II | Viola | Cello/Bass |
| Flute I | Flute II | Clarinet III | Bass Clarinet |
| Oboe I | Oboe II | Tenor Sax | Bassoons |
| Clarinet I | Clarinet II | Trumpet III | Bari Sax |
| Alto Sax I | Alto Sax II | Trombone III | Horn IV |
| Trumpet I | TrumpetII | Horn III | Euphonium |
| Horn I | Horn II | Xylophone | Tuba |
| Trombone I | Trombone II | Marimba | |
| Bells | Vibraphone |
(D concert) (Bb concert) (F concert) (Bb concert)
The final step in illustrating the relationship between dissonance and consonance is to use simple chord progressions. The building of a dominant seventh chord that resolves to tonic is a more sophisticated example of the way tension and release operate in a musical passage. The example below can be performed in any key by using scale degrees performed by different voices in the ensemble. I observed Steve Pratt from Indiana University using this exercise during his warm-up routine and thought that it was an excellent way to further illustrate this concept.
Dominant to Tonic
| Group I | C | 1 | – | 2 | 3 | | 4 | 5 | 6 | 7 | | | 8 | – | 7 | – | | – – | – – | |8 – – – || | ||
| Group II | C | 1 | – | 2 | 3 | | 4 | 5 | 6 | 7 | | | 8 | – | 7 | 6 | | 5 | 4 | 3 | 2 | |3 – – – || |
| Group III | C | 1 | – | 2 | 3 | | 4 | 5 | 6 | 7 | | | 8 | – | 7 | 6 | | 5 | 4 | – | – | |5 – – – || |
| Group IV | C | 1 | – | 2 | 3 | | 4 | 5 | 6 | 7 | | | 8 | – | 7 | 6 | | 5 | – | – | – | |1 – – – || |
After students experience how to find examples of tension and release in scales and chord progressions, it is a natural step to start using chorales to illustrate this principle by isolating dominant seventh chord to tonic cadences. The idea is to crescendo through the dominant seventh chord in the phrase and then release the tension on the cadence to tonic with a decrescendo. This gives the musical phrase momentum and a sense of direction.
Although there are other concepts that should be applied to musical interpretation (for instance, various note lengths, tapering of phrases, manipulating tempo through rubato), these first four principles can open up a whole new world of expression and musicality. If students actively respond to the music that they study using these techniques, the rehearsal can quickly become an environment in which each performer explores personal musical imagination and creativity.
Beck, Dennis. “Exercises to Improve the Basics.” The Instrumentalist, June 2002, pp. 70-72.
Paynter, John. “A Daily Warm-Up Routine.” Band, September/October 1984, pp. 6-9.